Panning
One technique that is fairly easy to learn and can provide you with some stunning visual results is panning. It can help you to imply motion, bring energy and excitement into your photographs. This is one element of photography that can help to invoke emotion in your viewer and make your images stand out. Here is a picture of a cyclist. It is properly composed. It is properly exposed. The colors are well balanced. What's missing?
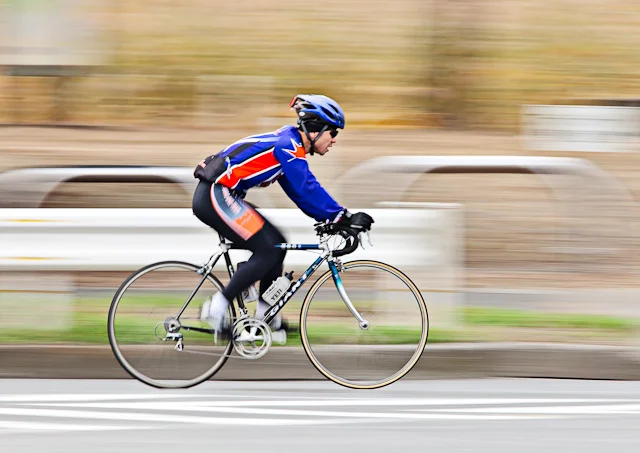
ENERGY! MOTION! EMOTION! Have a look out our cyclist for a moment. He is riding a very high end bike. He is decked out and ready to race. Seems a little strange that he is out for a casual slow ride. Have you heard the expression motion creates emotion? Have a look at the photo below.
What do you feel when you see this? Do you feel the energy and movement of the rider? Is it more exciting than the first picture? To me, one feels like a race while the other feels like the rider is out for a casual ride. Both were actually flying by me at ~30km an hour.
All it takes to master panning is practice and patience. I am sure there are many approaches and ideas of how best to execute this technique. Here I will explain what works best for me but if you have a different technique that works for you or tips to share, please leave a comment.
Let start with getting the right settings on your camera. While I typically shoot my camera in manual mode, shutter priority is the best choice when panning. The primary concern is getting your shutter speed to a level where you can keep your subject sharp while blurring their background. This will also allow your camera to adjust the aperture if the subject moves into different lighting conditions such as under a shaded tree. I recommend setting your ISO as low as possible to reduce the potential of any digital noise. One thing to consider if you do this is your might end up with very small apertures such f/19 so you'll need to look out for lens dust in your final photos. They are easy to clean up in Photoshop and well worth the lack of noise in the photo.
For shutter speeds, I have seen people use anything from 1/60 to 1 sec, for me I have found that 1/20 is perfect for me. What works for you will mostly depend how steady you are holding your camera and how steady you can pan your subject. Make sure your focus mode is set to AI Servo so your camera continually focuses as you pan your subject. Lastly make sure your shooting mode is continuous. Now let's start some panning...
If your subject is approaching you from the left, plant your feet squarely in front of you as if you were looking ahead and then then the upper half of your body to the left to start tracking your subject. This might be a little uncomfortable or seem unnatural at first but it will help you to track your subject smoothly and get better shots. Think of your waist as a spring that is being wound up as you turn left and unwound as you snap right tracking your subject. You want to do this with smooth and steady movement. Try to avoid speeding up or slowing down if your subject is moving at a consistent speed and continue shooting a few shots after the subject has finished passing right in front of you. This help you from jerking the camera to a stop on your last photo and missing your shot but you might also get a few extra keepers that you didn't expect. If you are having trouble keep the subject where you want without slowing down or speeding up try using a wider angel lens and crop the photo later. Have a look at some of the results that you can achieve with this technique;
The great thing about panning it is doesn't require additional equipment. There is no set up time required. Sometimes I am very busy with family and work commitments that I cannot dedicate the time I want to photography. With panning, you can simply be out for a walk after dinner and stop on a near by corner and spend time minutes and go home with some amazing shots. Giving panning a try, you'll be glad you did.


