


My minimalist digital workflow
Workflow is a very important part of the photographic process. When I first got into Digital Photography I didn't really understand what all the fuss about workflow was. Is this really that complicated of a topic? Well it can be. Things get messy quickly especially if you start shooting a lot and have 1,000s of files and don't have a system for managing them. It also has a profound impact on how quickly you work. Everyone has their own flow that works for them. As with everything, there is no right or wrong, just simply find a workflow that works best for you and your needs. My approach is minimalist and simple as I am posting daily I need to be quick. Perhaps too simple for many but it works for me. This is a topic I get a lot of of emails on so I thought I would explain the flow I follow so I documented out my workflow for yesterday's posting. If anyone has suggestions for my work flow, I am very happy to hear them as I am always looking to improve. A lot of people spend hours in Photoshop and create some really amazing images. I am not one of those people. I prefer to spend what little free time I have on taking photo or blogging and don't really want to spend a lot of time inside working on my images. I am also working to a deadline with my blog so whatever post processing I do needs to be effective and efficient. I am also not that skilled in Photoshop so when I do decide to do things in Photoshop it takes me a while...
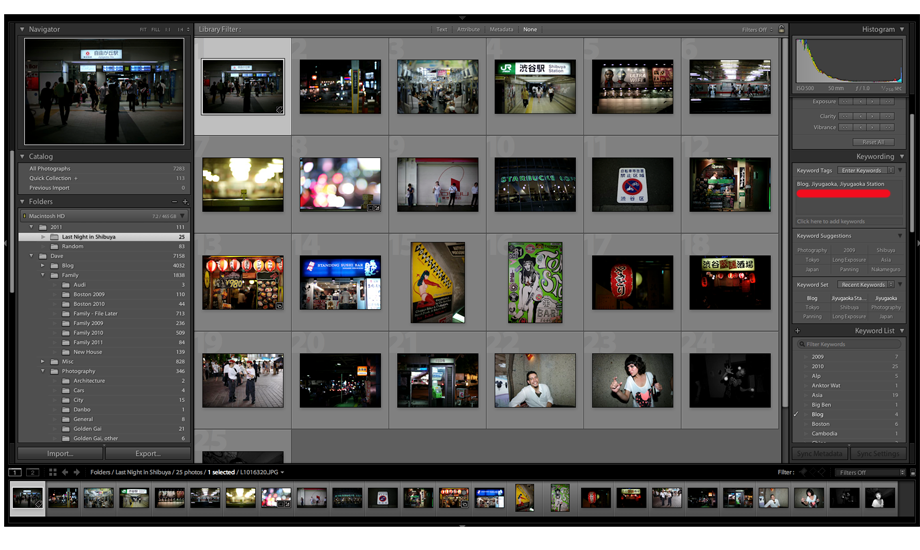
I shoot RAW without exception as RAW brings a lot of significant benefits such as the ability to non-dystrutive changes to things like white balance, brightness, contrast, and a whole host of other things. So the first thing you need to do when shooting RAW is important your photos to a RAW editor. I use Adobe's Lightroom for my RAW editing and management of all of my files.

Once my photos are imported I quickly go through them and reject the ones I am not keeping by hitting 'x'. You can see them getting grayed out. I also tend to not take a ton of photos. I think one of the benefits of shooting a range finder is you tend to shoot less shots which really helps with your workflow...Lightroom offers lots of ways to rate your colors with stars, colors, numbers. I find breaking them into keep/don't keep works for me.

Once I have my 'keepers' I rename my folder to the name of the event or blog post for the day. My filing system in Lightroom is very straight forward, I have 4 main folders; Family, Photography, Blog and Misc. In my blog for example, I simply have a folder for each blog posting. Over time I will probably archive a year off but I like sorting it by post name as that is typically how I go back looking for images if I am not using the meta data to find what I am looking for.

I don't have as much free time as I would like for photography and blogging. I get asked a lot how I am able to keep up the pace I do with the blog. Honestly a lot of it has to do with being very focused when I am in my workflow and following a very strict workflow. I also avoid distractions like talking on the phone or watching TV while I am doing it. I typically do very little, if any, post processing on my photos but if I need to tweak white balance, exposure, remove dust or correct the framing of the photo if I wasn't quite right. Below are the main control panels in Lightroom. There is so much you can do but I typically just use the ones I have unlined in red;
Black and White - As I am shooting in RAW if my intention is for a Black and White photo, I simply convert it to monochrome.
Exposure - If I was under or over exposed and didn't bracket I use this to adjust my exposure.
Blacks - Rarely if I am not getting the look I want, I will increase blacks a bit. The Leica is great at this so it's not often I need to do this.
Contrast - I use this a bit more than blacks to improve the contrast in a photo.
Post Crop Vingetting - I use this to darken up the edges of the photos.
Other than these, I will occasionally use the crop or spot removal tools. If I am posting up 20 pictures I will probably only touch 2 or 3 of them with Lightroom other than converting to B&W and .jpeg

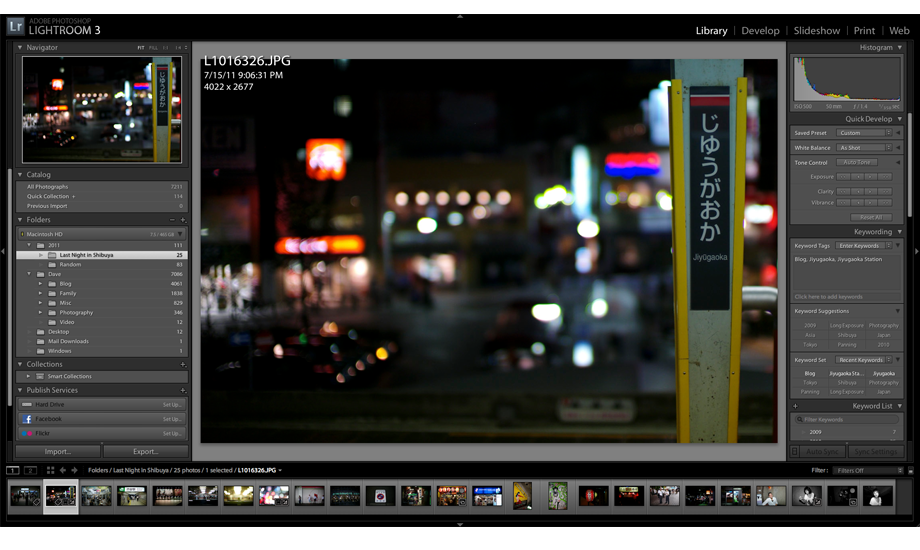
After I have my keepers I do some simple tagging of the meta data to make them easier to find later. For example, this photo of the Jiyugaoka Train Station that I am putting on my blog I might tag as; blog, Jiyugaoka, Jiyugaoka Station.
Once you have tagged a photo, can you easily sync across multiple photos...you can move very quickly if you are doing it as batch work.

Now that I have chosen and tagged my photos...now it times to review to see if there are any tweaks needed. I noticed I didn't like my cropping on this photo...I actually snapped it while on the train and couldn't get it just how I wanted it. I like the signs to be right aligned.

A quick adjustment with the crop tool gives me what I want...
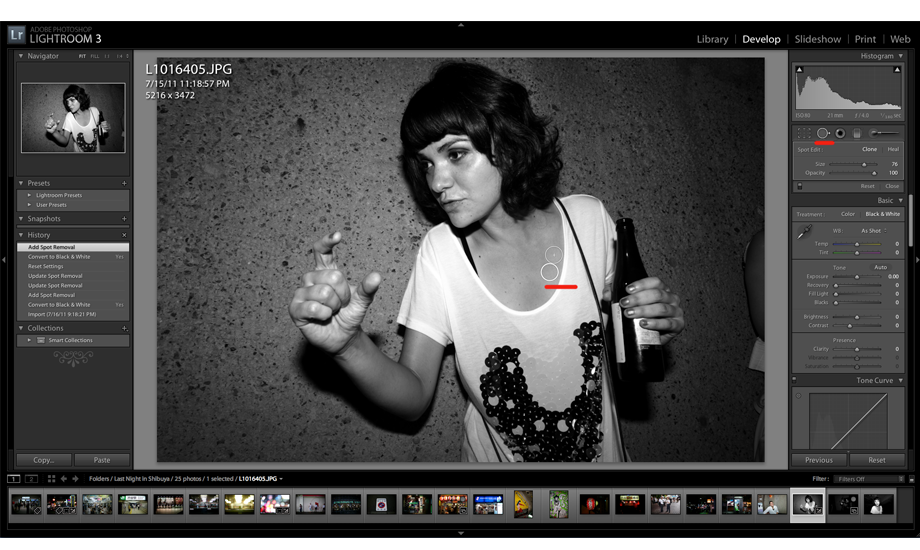
I decided to convert the last four flash photos to Black and White...

In Lightroom you simply need to click the Black and White button in develop. I know there are a lot of enhancements you can make to improve your B&W photos but I am pretty happy with what my Leica produces. As I was reviewing the photo I noticed I had a piece of dust or something showing up in the picture...

A quick use of the spot removal tool and all is good again...
That's it for my workflow... a posting of images. Now it's time to export them. I don't bother naming them as I keep everything in Lightroom to manage so I simply call them the name of the blog post and a sequence number to help me keep them in order when I upload them to my blog. I make sure the color is sRGB so the colors are web friendly. I choose a middle quality to keep the image size down. I really hate going to photography sites where every photograph is 2MB and it takes forever to load. I usually just end up leaving. I sharpen for screen and then I am done.
You will notice I don't put watermarks on my photos. I know this is a heavily debated topic. People with any reasonable Photoshop skill can remove a watermark with ease. I let people use my photography and simply ask for a link back or a credit in return. The image sizes I am putting up aren't huge so you can't do too much with them anyways. This approach works for me and I get contacted all the time by people asking to reprint my photos and often asking for a larger size. I suppose if this was my profession I might take a more serious approach but right now it's a hobby and I am happy for the exposure and this approach has served me well. I am going to play around with one of the reverse search services to see where my photos are showing up on the web. Should be interesting.
So that's my workflow. If anyone is interested in the blogging aspect, let me know and I'll considering writing that up.

Comments and feedback are always welcome. If you like what you saw today, please share it by clicking one of the links below. Thanks and see you tomorrow!


